Friday, October 7, 2011

Homemade Gifts


Last year we made homemade vanilla extract to give out to family and friends for Christmas. It is a long process but it was so much fun to make. Both the girls enjoyed the daily turning of the bottles so it was great to have something they could participate in too. We purchased these beautiful bottles and Shane designed a great label. I love how they turned out. If you are interested in trying it out, we roughly used this recipe. It worked perfectly.


We are now on the search for what to do this year. One idea I really think would be fun is flavored sugars. You could use them in baking or to add to coffee or tea. They also would be great to add to the top of simple sugar cookies for a little hint of flavor. I would love to try a vanilla flavored or orange flavored sugar.

Realistically, with building a house and expecting a baby in 2 months, our friends will be treated not to fancy flavored sugars but to a night of fellowship and a Christmas movie at our apartment.

Do you have any favorite treats to share during the holidays? Or a favorite treat you've been given in the past?

Friday, September 30, 2011

Preserving: Broccoli


Yesterday we woke up to a bunch of broccoli on the front porch, which we found out later was from a generous neighbor. Getting surprises like this is always a blessing. So what do you do when you get this much broccoli early one morning?


Well you eat some fresh of course. Then with the aid of a little helper you blanch and blanch and blanch. We just put batches (about 2 cups) of broccoli into boiling water for 2 minutes then quickly dumped them into an ice water bath. Once the broccoli was cool we laid it out on a clean towel to dry a bit.


Most of the broccoli went into bags in the freezer for dinner use later in the winter when fresh veggies cost more. I'm already thinking of different soups and casseroles to add it too.


We also saw this recipe for pickled broccoli and thought we'd try a little. We just did half the recipe and ended up with three little 8 oz. jars in the refrigerator. I'll let you know how it turns out.


And of course, we set some aside for our dinner of potato broccoli cheese soup. I did not get a picture of it because we all ate it too quickly. I think we will definitely be repeating that soup as the weather gets cooler but in a bigger batch next time.

Thursday, September 22, 2011

New Fabric

I just purchased these beautiful fabrics. Some will be turned into gifts for Christmas. I know it is only September but with a baby due in December I'm trying to think ahead this year. Plus, it is an acceptable excuse to purchase fabric.


 I purchased this set of reds mostly because I don't have any reds in my stash.


I think I may use these pretty jewel colors for a quilt. I really love rich colors like these, especially for baby quilts.


Finally, I have been loving quilting and sewing with solids lately and I love fall colors. So I just couldn't resist adding this little set of fat quarters to my stash. Not sure what I do with them yet but I'm sure to use them eventually.

All of these were purchased from Sew Fresh Fabrics. They were so quick and wonderful to do business with and I love that they have unique fat quarter bundles were they mix some matching solids in with prints.

Monday, September 19, 2011

Triangles and Free Motion Quilting


I like to try new things. As I mentioned here, I think that mug rugs are a fun way to try out new quilting techniques. I've had a similar design in mind for a quilt since I've seen so many amazing ones online. This was one of my favorites. It is wonderful in so many ways but a quilt that size in those little triangles was a little too much for me.

I have never tried quilting and piecing with triangles before. It just seemed so intimidating. Choosing the fabrics was a fun way to start. I decided on bright blues balanced with a linen colored solid. I really like the backing fabric, which is the color inspiration for the front. Then I just started cutting and sewing and before long I had this little mug rug. The binding is a brown solid I made from some scraps I had.


When I was thinking of how to quilt it I figured why not try some free motion quilting. This pattern is common and I basically tried to get even spacing on the stitches and not overlap any of the quilting lines. It was so fun. I am definitely going to do more free motion quilting. I love how this one turned out and with practice it will get even better.


So this time around I learned that practice is good when it comes to free motion quilting. And like every quilter will tell you, squaring up your blocks is really important. Next time I will also take the time to really set my seams better with the iron so that my corners hopefully will match up a little better.

If you'd like more info on this mug rug you can see more over here in the shop.

Thursday, September 15, 2011

Baby Quilt: Pink and Brown


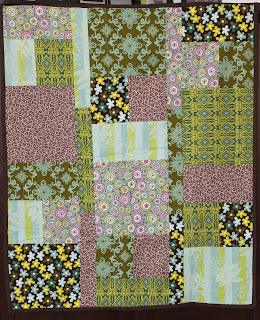
Here is another quilt I made recently. I wanted to try out something a little different so I just sort of went for it. First I cut up all the squares using fabric I had in my stash. Then I laid out the squares before I started sewing them together just to make sure the overall flow of lighter and darker prints was even throughout the whole quilt. I originally planned to use a brown solid for the sashing but once the blocks were completed it seemed like the dark chocolate brown would be too dark and overwhelm the squares. Instead I decided to sash them all in a solid pink flannel, which came from a receiving blanket.


I saved the brown and used it on the back. I have always wanted to try a pieced back and since I did not have quite enough brown this was a perfect opportunity. I had cut a few extra squares for the front to give me options when I was laying out the quilt so I just cut those in half and sewed them all together to fit across the quilt.

For the binding I used a bit of two prints from Anna Maria Horner's Chocolate Lollipop line which made an appearance in the squares. They are the same print but in different colorways so it worked well. It is not something you would notice right away but I think it gives the quilt more interest as you look closer. Overall I'm really happy with it.


For the quilting I did cross-hatching through all the squares and also added a few straight lines on the sashing. I really like how the quilting shows up on the brown backing. I feel like I learned so much making this quilt. It was my first attempt at making a quilt with absolutely no pattern for reference which was intimidating but really fun. I already have a few more complex designs that I'm working on both in my head and on paper. This quilt measures 40 inches by 47 inches and is up in the shop if you're interested in it, check it out here.

Wednesday, September 14, 2011

Ravenclaw Mug Rug


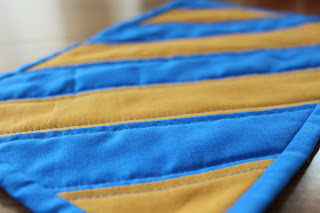
A mug rug is a little quilt between the size of a coaster and a placemat. Perfect for coffee and a muffin or milk and cookies. I've been thinking they would be fun to make for a few reasons. First they would be a quick project since they are so little. Second, I could use up scraps and bits of favorite fabrics I have laying around. And finally, they would give me a chance to try new quilting techniques. Trying out a new pattern or quilting style on a large quilt is sort of scary. I worry about ruining fabrics or just plain making a mess of a project. However, with a mug rug at worst I would have to scrap a little 6 inch by 10 inch quilt: definitely not as intimidating.


When our dear friend, Frankie, turned 30 this August we wanted to make him something unique and special. He is a huge Harry Potter fan and he is a Ravenclaw. If you read the books or have seen the movies you know what that means, if not just know that Ravenclaw's colors are blue and bronze. So I decided to make him a little Ravenclaw mug rug for his desk at work. I went with a classic stripe for the front. Then used the bronze for the backing and blue for the binding. It includes a thin piece of natural batting and is quilted in straight lines with blue thread. You really notice the quilting when you look at the back. I really like the effect of the blue quilting on the bronze fabric. 


After giving Frankie his gift I had enough fabric left over to make another Ravenclaw Mug Rug. If you are interested you can find it here in the shop

Tuesday, September 13, 2011

Baby Quilt: Greens and Brown


 I have made a few baby quilts over the past couple years as gifts for expecting friends and family. This one is made from some of my favorite fabrics from Anna Maria Horner. The front is a simple patchwork similar to some quilts I've made before using her Chocolate Lollipop line of fabrics. I then added a soft flannel fabric for the back, from her Folksy Flannels. I really love putting flannel on the back of baby quilts. It adds just the right amount of warmth for a light blanket as well as adding a super soft feel for the baby. I used a solid brown Kona fabric to make the binding which was finished with hand stitching. The quilting is just a few straight lines to hold the layers together.


The finished size is 34 inches by 41 inches so it is perfect for a baby, toddler, or young child. It is also great for using as a play mat or even a wall hanging. This is the first quilt I've made for in my new Etsy shop. If you'd like to take a look you can find the listing here. The shop is new (like the blog) so let me know what you think. I have some more things to add in the next few days so check back soon.


Saturday, September 10, 2011

Watermelon Jelly


Yes you read that correctly, watermelon jelly. Shane and I both have become more interested in canning in the past year or so. We like the idea of getting produce when it is fresh and canning it for during the winter. I also like the idea of being able to control all the ingredients I feed my family. Living in an apartment in a large city does restrict our ability to grow lots of our own produce. However, I am learning how to find locally grown produce at a cheap price. When something is in season it is so much cheaper and that is the time to can. At least for our family it is the right time.

A couple weeks ago I saw this recipe for watermelon jelly from Food in Jars. It seemed intriguing to say the least. I'd never heard of watermelon jelly before. But last week when I found watermelon for 9 cents a pound I was ready to try out the recipe. I have made freezer jams many times before in different berry flavors but this was my first try at a jam or jelly that needed to be cooked, canned, and processed in a water bath. It was a bit intimidating for my first try and the smell of the cooking watermelon didn't encourage me at all. So I prepared myself for the worst. But for a dollar worth of watermelon and a couple other ingredients I was not going to worry too much. When we canned the jelly it did not seem like it was going to set however when we came back the next morning all 6 jars had set nicely.


We tasted it on toast with butter and it was really yummy. As you can see in the picture only 5 jars are left. It is refreshing and has a very light flavor. We have plenty for now but I will definitely make it again.

Thursday, September 8, 2011

Large Fabric Ball


I made this ball for a friend's baby. He will be turning one this fall and is at a perfect age to play with a soft fabric ball. You may have seen a similar one here that I made last Christmas for Violet. I used the same pattern, found in the book Seams to Me from Anna Maria Horner, but I modified it just a bit. Whenever I try out a pattern or recipe I tend to follow the rules the first time and then immediately start making it my own by adjustments and changes. Sometimes these changes work out well and sometimes they fail. I've learned that by following guidelines closely the first time I learn a lot. When I'm seeking to learn a new skill or try something a little different, following the advice and steps of somebody more advanced them me is beneficial. But my creativity gets sort of antsy at just following along so I begin to think about ways to modify even during this process. Usually these ideas either stay buried in my head or scribbled down on a piece of paper somewhere. Occasionally they may get thought about and worked out enough to make it to creation.


For this ball, I used fabrics I had in my stash and scraps from other projects. Recently, I have been loving combinations of colors with gray so I just looked at what I had and started pulling out different options. In the end gray made only a small appearance and was mixed in with rich blues, greens, and browns.


When making toys for little ones I think lots of colors and patterns are perfect. I hope he plays with this for years to come.

Tuesday, September 6, 2011

Beginnings


I have kept a blog for a few years now. It has been a fun learning experience. As I have grown individually, in my family life, and as a crafter my interests have changed slightly. I'm beginning a new blog with the hopes of focusing in on the things that are really becoming a passion for me. I'm a stay at home mother of two girls and we will soon be welcoming our first son into our family. My husband and children are a high priority, second only to God. The goal and dream of this blog is to share the things that I make, the things I'm learning along the way, and the things that are inspiring me. The name Mulholland Homestead is really just a reflection of my world. We live in an urban area yet try to keep things simple and focused on values and family. I hope you will enjoy this journey with me.

The pictures are of fabrics I started cutting for two new quilts. I have a specific plan for the solids in greens, blues, and grays. The bright crayon box colored strips I cut up one afternoon last week. I'm not completely sure what they will turn into but I am excited about the possibilities.